Pages

Thursday, July 27, 2017

How to Stitch a Single Layer Applique

Hi there friends!  
Today we're going back to basics, and I'm going to show you all how to complete a single layer applique design on an embroidery machine.  


When I bought my first machine, I had no idea how to actually use it or the steps involved in creating an applique. It took a lot of trial and error, and since machine embroidery wasn't as wildly popular as it is today, there wasn't a ton of information out there on how to do it.

I remember feeling like this a lot! 

So, for anyone out there that is new to machine embroidery, I hope this post is helpful to you and sheds some light on the whole process of applique!

So here we go...

How to Stitch Out a Single Layer Applique:

Before I can get started, I had to load an applique design from my computer 
to my machine, place a piece of cut-away stabilizer in my embroidery hoop, 
and attach the hoop to the machine. 


Once you have that done, you're ready to get stitching!

Basically, every applique design is made up of four steps.  
So follow along with me as I complete the steps to execute a 
perfect applique using your embroidery machine.


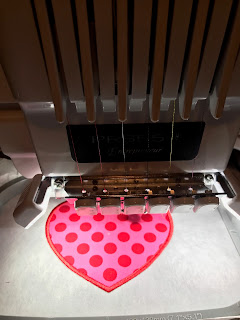
1. Trace Stitch - which shows you where to put your fabric


Once you see how large the design is going to be, grab your fabric 
and cut a piece large enough to cover the area traced by your machine. 
I usually iron my piece of fabric before I put it on the machine, 
so that it's flat and I won't end up with  any bubbles.


After you cut and iron your fabric, place it on your stabilizer 
and make sure it covers the trace stitches completely.


Now that your fabric is in place and flat, start the next step on your machine.


2. Tack Down Stitch - which tacks your fabric down to your stabilizer


The fabric is tacked down and I'm ready for the next step!


3. Trim your fabric!


Detach your hoop from your machine, and grab your favorite pair of 
curved tipped scissors and get to trimming! 


Make sure you cut as close to the edge as possible,
 without snipping the fabric inside the stitching. Once you have that done, 
put your hoop back on your machine, and you're ready for the next step!


4.  Cover Stitches - usually a combination of straight, zig zag, and statin stitching that finishes the edge of your applique


This step takes the longest, because the edge of finished applique 
is made up of a series of underlay stitching that secures the fabric 
to the garment or stabilizer. 
Most appliqués are completed with a satin stitch as seen above. 


Once you're done, your machine should give you a little message 
like this, and you can remove your hoop from the machine!
 You're done!!


I hope this tutorial was helpful to you!! 

You can find this heart applique design in my etsy shop! :)

Happy sewing!!
SaveSave
SaveSave

Friday, July 7, 2017

Let Me Introduce Myself

My name is Elizabeth and I'm a craftaholic.  There it is, I said it.  So now we can move on and there won't be any secrets between us! (besides maybe my obsession over school supplies, but I'll save that topic for a different post, haha)  It really is true, I am a lover of all things creative.  For as long as I can remember I have always enjoyed coloring, painting, sewing, craft projects, scrapbooking, jewelry making, pottery, drawing... You name it, I've tried it.
 It all just makes me so happy! 


#truestory #ihopeheavenhasahobbylobby

So, anyways, you get the picture - I love crafting, but this is a sewing blog so let's talk about where this all started! So, a long long time ago my mom bought me my first sewing machine. I loved it.  It was huge, heavy, a fossil even, but it was mine.  My mom has always loved sewing and quilting, she even made her own wedding dress! #skills  So sewing was something fun we could do together. The summer after 2nd grade she helped me make my first quilt.

A little sampler. I was so proud of it!

That same year, she enrolled me in a sewing class. I learned a lot, and one of our projects was to make a night gown. I found this really soft stretchy waffle knit fabric, and I made a really ugly really comfortable night gown. I wore it from age 8 until age 28 when my husband threatened to burn it, and so to save it, I passed it down to my 6 year old. He still cringes when he sees it, but I'm glad it's still in the family. ;) 

Isn't she pretty??

After elementary school I didn't sew much, so fast forward about 15 years. I was 23, a new mom staying at home with my baby girl, and trying to figure out a way to make a little extra money by doing something fun.  I started looking into machine embroidery, so that I could make baby outfits. I decided to give it a try, and bought this sweet little machine:

Brother SE-400

I sewed my heart out that fall on this machine. I opened up my first online boutique, and appliquéd  onesies, made tutus, and sewed with pretty much every spare minute I had.  One night while I was stitching out turkey onesie number 1,001 (not really, but I made so many I was sick of them) it croaked.

They looked something like this. Sorry it's fuzzy, I can't find a better picture, and honestly I don't want to. I'm still sick of that design. haha!

 I took the machine to a local repair shop, and they couldn't even fix it. I had just sewed on it until it could sew no longer! So, I decided that since business was going well, it was time to invest in a little bit bigger machine. 
So, I bought this:

 Brother Innovis 1500D

I love this machine, it was a great in between machine that did sewing and embroidery. I still use it today as my backup machine!  She's been good to me!

But, about two years ago, I decided to throw caution to the wind and invest in a commercial machine.  I.love.this.machine. It's so wonderful. I can program it, get everything set up, and then walk away while it completes the designs.  The quality of the embroidery is amazing too. It was the best decision. 


I run a local monogramming business with it, but best of all I test stitch all of my designs for Fairytale Applique on it. Fairytale Applique is my design business where I sketch, digitize, and then sell my applique and embroidery designs for other women who do machine embroidery.  You can find links to my website (it only has a fraction of my designs listed, still working on it), Etsy shop (which has my full product offering), and social media accounts on the right hand side of the screen. 

My hope with this blog is to provide my fellow seamstresses with useful information to help you along your journey. I'll be posting embroidery tutorials, favorites, and machine embroidery hints, tricks, and tips. 
Thanks for stopping by!! Happy sewing!